Data Store Discovery
The Data Store Inventory page is found in the Management section of the left navigation.

When no data stores have been connected to Netskope One DSPM, Netskope One DSPM Super_Admin will have the option to connect a data store. Based on the type of data store they want to connect to, the Super_Admin may or may not need to onboard an infrastructure to Netskope One DSPM. If onboarding any of the Cloud Service Provider (CSP) Platforms (AWS, GCP, and Azure), they will have the option to auto-discover data stores. When Auto-Discovery is turned on, Netskope One DSPM with discover all the data stores and they will have the option to see discovered data stores.

Discovered Data Store list with the Data Service and Endpoint details can we found under the DISCOVERED tab.

The admin can now connect to each of the listed data stores by providing the right credentials. Once the admin performs the discovery, the data store auto-discovery feature is turned on for the future with a default scan frequency of 60 minutes.
Additionally when enabled, Netskope One DSPM performs daily scans of Amazon Elastic File System (EFS), Amazon Elastic Block Storage (EBS), Google Persistent Disk, Azure Managed Disk to identify and display unmanaged data stores such as MySQL, PostgreSQL, MariaDB, Oracle and SQL Server installed within these volumes. These unmanaged volumes can be discerned from other data stores using the “Unmanaged Data Store is true” filter.
.png)
When a data store is connected, you will see it in the CONNECTED tab with data store metadata details: platform, service, data owners, region, sensitivity score, and data store risk rating, along with the number of sensitive data types, number of sensitive fields or files, number of sensitive records, and associated data tags. Use the Column icon dropdown to reveal other possible column headers, such as total size, sensitive data size, account, and endpoint.

The Overview section details data store size, sensitive data size, and query and alert counts.

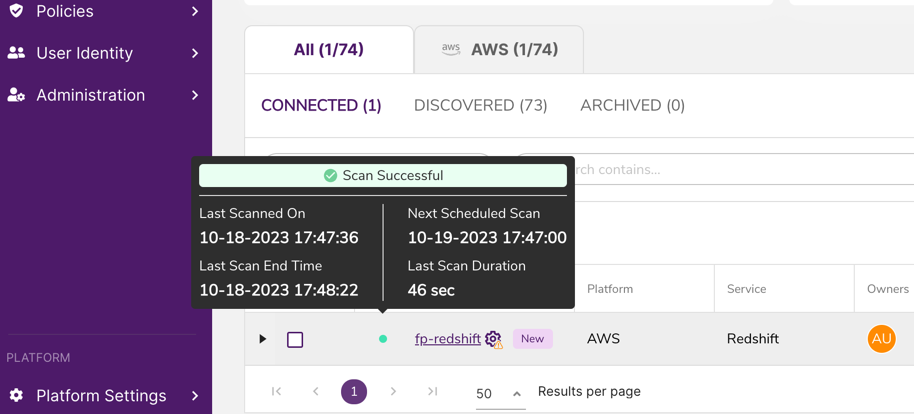
Each connected data store also displays a tooltip with status details on the last scan, including whether the scan was successful, failed, in progress, or aborted. It also shows time and date details for last and next scans. View the tooltip by hovering over the colored status icon to the right of the data store name.
When a data store is connected, Netskope One DSPM also performs configuration analysis to determine misconfiguration risk and privilege analysis to determine data store access. Comparing data store access with a user's last access time helps determine their Over Privileged Risk Score. These are also displayed by expanding the data store display using the black right-facing arrow to the left of the data store name.
Visit our Configuration Analysis article for details on misconfiguration risk calculations.
Maintaining Connected Data Stores
Once connected to a data store, the administrator can use the Edit icon under Actions to update configurations if needed. These configurations are identical to the ones selected when they first connected the data store. Other supported actions include:
- Turning on/off auto-scan
- Initiating a manual scan
- Applying or removing Data Tags on the object-level (databases, schemas, and tables) or file-level. To learn more, please visit Using the Classification Management Page
- Assigning sidecar pools
- Disconnecting data stores
- Quick-filtering to show only scans in progress

Data Catalog Hierarchy
Data Stores for Structured Data
Each data store can be drilled down into its data set hierarchy to the respective databases, schemas, and tables. At each level of the data set hierarchy, you can see the respective metadata details:
For a database, you will see the database-level owners, schemas, tables, fields, sensitive fields, sensitive records, and database-level data tags.

For a schema, you will see the schema-level owners, tables, fields, sensitive fields, sensitive records, and schema-level data tags.

You will see the table-level owners, fields, sensitive fields, total records, sensitive records, and table-level data tags at the table level.

Clicking on a table name will take you to the Classification Management page, with fields filtered for this schema. Visit our Classification article for details and to see our built-in classifiers.
Data Stores for Unstructured Data
From the Data Inventory page, an unstructured data store expands to show the total size and sensitive data size for the data store, number of files, file extensions, and file types, along with standard configuration and privilege analysis. The number of sensitive files appears in the Sensitive Fields/Files field.
 Clicking on the data store name reveals all information for recently sampled files in the data store, including classifiable file types, size, sensitivity level, associated data tags, and occurrence count (at last scan).

Clicking on the number of sensitive data types associated with an unstructured data store from the Data Store Inventory page will show a smaller snapshot of the view above. Clicking on the number of sensitive files will take you to the page shown above.
Shadow Data Analysis
If supported by the data store, the Shadow Data Analysis section will show the size of stale data, when it was last accessed, and by whom.
 |
 |
This can be enabled and configured when connecting the data store from the Capabilities page. Customize the last access time and period for stale data.
 |
 |
 |
 |
Deleted Objects
When objects are deleted from your remote system, they can be identified at each level of your Data Set hierarchy by clicking the SHOW DELETED button. The object will appear with a deleted icon to the right of its name.
 |
 |
Note that deleted databases will only appear as deleted after being missed by Netskope One DSPM in five consecutive scans. This is to intentionally prevent errors that may appear during normal maintenance.
Bulk Actions to Data Stores
By clicking on the left side pick-list, you can take the following actions on multiple data stores at once:
- Adding and removing tags
- Enabling or disabling auto-scan
- Editing owners
- Disconnecting (details in section below)

Using the method described above, you can adjust tags and owners in bulk throughout the Data Catalog hierarchy. Once you've saved the bulk action, you'll be informed if it was successful or only partially applied.

Saved Views
The Data Store Inventory supports defining saved views. Each saved view is a saved configuration of displayed columns & applied filters, which you can switch between as you operate within different contexts. For example, one saved view might allow you to research data stores with certain scan results, while another saved view lets you focus on data stores with specific tags. Saved views can also support your team outside of the Netskope One DSPM application by letting you repeatedly create CSV exports of specific columns and rows.
There are two view types:
| Type | Description |
|---|---|
| Default View | Displays the most important columns by default, with no filtering applied. |
| Saved Views | One or more private, user-created views, each of which can be saved with specific filters that are enforced when the view is in use. |
As you add saved views, their names are displayed as individual boxes within a view ribbon. Click any of these boxes to change the view currently displayed, which will be highlighted in light purple. Longer view names are truncated, but their full name is displayed when hovering over its box:
There is always a single view designated as the preferred view, identifiable by its star icon, which is displayed each time you visit the Classification Management screen. In the absence of any custom ones, the first view is automatically designated as the preferred view:


Create a Saved View
- Configure your desired filters, sorting, and column display. The “Unsaved Changes” label displays.
- In the view ribbon, click the Add button (plus sign).
- The Add View modal is displayed.
- Enter the following values:
| Field | Value |
|---|---|
| Name | Any unique value |
| Set as Preferred View | Mark this box if you wish this saved view to become the new preferred view |
- Click the Save button.

Rename a Saved View
- In the view ribbon, select the view by clicking its name.
- Click the view’s context menu icon.
- In the context menu, select the Rename option.
- The Edit View modal is displayed.
- Enter the following values:
| Field | Value |
|---|---|
| Name | Any unique value |
| Set as Preferred View | Mark this box if you wish this saved view to become the new preferred view |
- Click the Save button.

Update Filters and Columns for a Saved View
Besides renaming a saved view, you can also add or remove its applied filters & displayed columns. Whenever you have outstanding edits, the label “Unsaved Changes” will be displayed alongside the current view’s name:
- In the view ribbon, select the view by clicking its name.
- Configure your desired filters, sorting, and column display. The “Unsaved Changes” label displays.
- Click the view’s context menu icon.
- In the context menu, select the Save option.

Designating a View as Preferred
- In the view ribbon, select the view by clicking its name.
- Click the view’s context menu icon.
- In the context menu, select the Set as Preferred option.

Delete a Saved view
- In the view ribbon, select the view by clicking its name.
- Click the view’s context menu icon.
- In the context menu, select the Delete option.

After you delete the last saved view, the first view is automatically designated as the preferred view.
Disconnecting Data Stores
There are instances where you may no longer need Netskope One DSPM to monitor a connected data store, including data stores that may be empty, decommissioned, or mistakenly connected. Netskope One DSPM allows for disconnecting of data stores, removing their data from other screens. The application will then only display information related to connected and scanned data stores.
Disconnecting a data store results in the following outcomes:
- The data store is moved from the “Connected” tab to the “Archived” tab. It can later be reconnected.
- The data store’s data is removed from other screens within the application, including:
- Classification Management (fields)
- User Assessment (Usernames, historical queries)
- Privileges Analysis (Data Store)
- Alerts & Tasks (alerts are auto-resolved)
- Employee Management (Usernames, user-to-employee mappings)
- Service Accounts (Usernames)
- A user activity record is created in the Activity Logs.
The ability to disconnect data stores is limited to anyone with the RBAC permission to delete data stores, including users with the “Super_Admin” role.
Data stores referenced within conditions of an active policy cannot be deleted until you either:
- Update the policy to no longer reference the data store; or
- Deactivate the policy.
To disconnect a data store:
- Navigate to the Data Stores > Data Store Inventory screen.
- Click on the Connected tab to display a list of connected data stores.
- Under the Actions column, click the menu icon for the data store you wish to disconnect.
- Select the Disconnect option.
- The UI will display counts of records that will be impacted by the disconnection. To proceed, click the Disconnect button.
- The affected Data Store will be moved from the “Connected” tab to the “Archived” tab.
To disconnect data stores in bulk:
- Navigate to the Data Stores > Data Store Inventory screen.
- Click on the Connected tab to display a list of connected data stores.
- Click the check boxes in the far left column to select which data stores to disconnect
- Click Disconnect from the options shown in gray above the connected data stores.
- The UI will display counts of records that will be impacted by the disconnection. If you need to adjust policies for a data store disconnection, that alert will display, and you can proceed with the disconnecting the data store(s) not affecting policy.
- To proceed, click the Disconnect button.
- The affected Data Store will be moved from the “Connected” tab to the “Archived” tab.

When disconnecting an unstructured data store, the disconnect modal displays the number of classified sensitive files that will be removed from Netskope One DSPM.

Archiving Data Stores
In some cases, there may be discovered data stores you do not wish to ever connect to Netskope One DSPM. You can move such data stores from your main views, which then permits you to focus on those you care to monitor.
Archiving a Data Store
- Navigate to the Discovered sub-tab.
- For the Data Store you wish to archive, click its Archive icon.
- The Archive Data Store modal is displayed.
- In the modal, enter a Reason value (optional) that explains why this Data Store is being archived.

- Click the Archive button.
At this point, the Data Store is moved from the Discovered tab to the Archived tab.

Viewing Archive Details
- Navigate to the Archived sub-tab.
- For the Data Store you wish to investigate, click its View Archive Details icon.


Unarchiving a Data Store
You can connect a previously archived data store by taking the following steps:
- Navigate to the Archived tab.
- For the data store you wish to reconnect, click Connect.
Once you've completed the steps to connect, the Data Store is moved from the Archived tab back to the Connected tab.
