Overview
These instructions are used for onboarding AWS Accounts and Organizations as infrastructure connections within Netskope One DSPM via CloudFormation. Such connections permit Netskope One DSPM to discover your available data stores and facilitate scanning and classification activities. You will repeat these steps for each AWS Account or Organization you wish to onboard to Netskope One DSPM.
For these instructions, you will start activity within Netskope One DSPM, next be directed to perform actions within the AWS console, then finally return to Netskope One DSPM to complete the connection.
Instructions for Infrastructure Connection
Individual AWS Account
You will repeat these steps for each individual AWS account you wish to onboard within the Netskope One DSPM application.
Steps to Complete Netskope One DSPM Infrastructure Connection
- Log into Netskope One DSPM.
- Navigate to Administration → Infrastructure Connections → AWS tab.
- Click the Add Infrastructure button in the upper right.
- Ensure AWS is selected and click ADD ACCOUNT.
- On the Capabilities tab, set the following toggles depending on your discovery & classification needs:
| Toggle Description | Details |
|---|---|
| Auto-Discover New Data Stores | Enables the auto-discovery of newly-created data stores, to ensure that DSPM is always aware of all possible data stores |
| Auto-Discover Unmanaged Data Stores |
Enables the auto-discovery of data stores on your disk volumes, to also ensure that DSPM is always aware of all possible data stores. This is disabled by default, as it can lead to performance impacts depending on the volume of disks to be scanned. |
| Ingest Tags | Enables ingestion of AWS tags associated with each connected data store, for use within both filters and and downstream policy conditions. |
| Authorize Data Store Snapshots Access | For low-touch onboarding using snapshots, enables the inclusion of the necessary IAM permissions within the CloudFormation templates and Terraform scripts generated by DSPM. These infrastructure-as-code (IaC) files are generated in the next step of infrastructure onboarding. |
- Click NEXT.
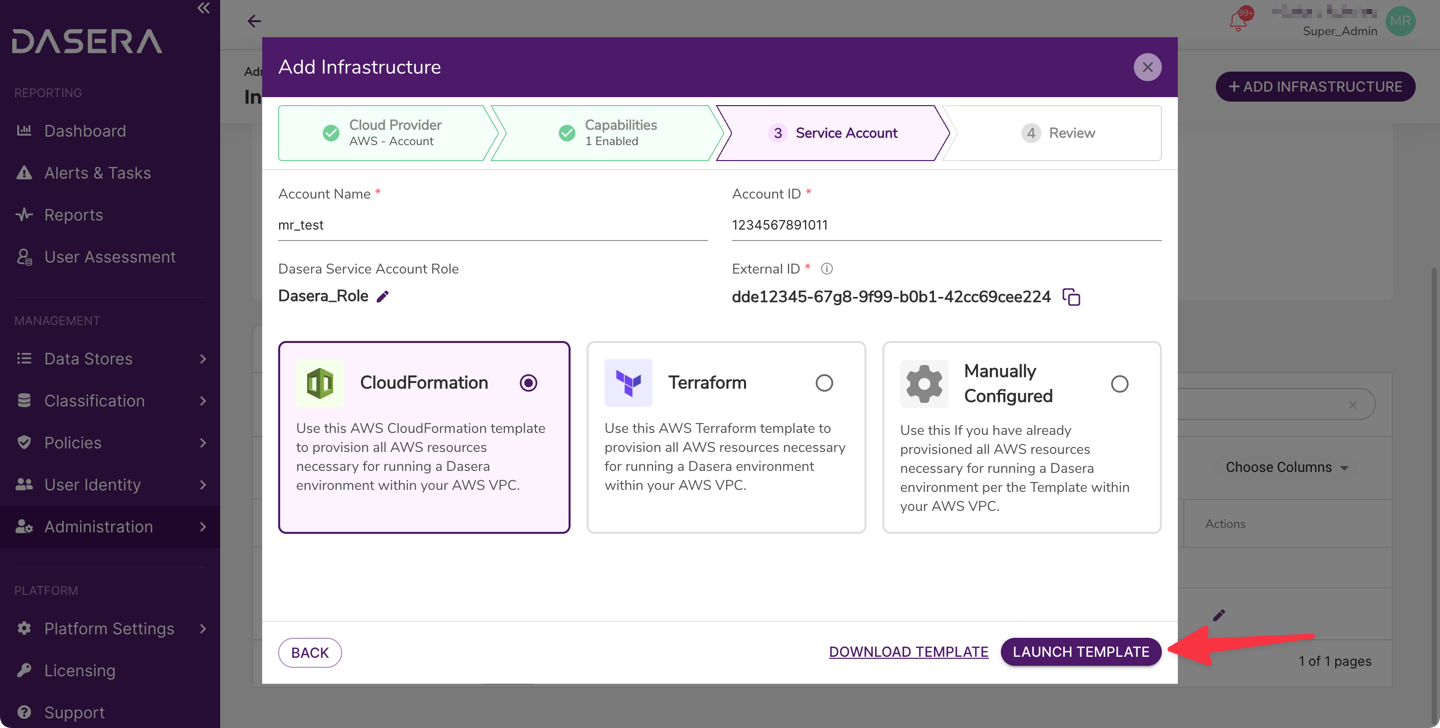
- Enter the following values:
| Field | Value |
|---|---|
| Account Name | Any value (this is used to identify your infrastructure connection within Netskope One DSPM). |
| Account ID |
Obtain from your AWS console: 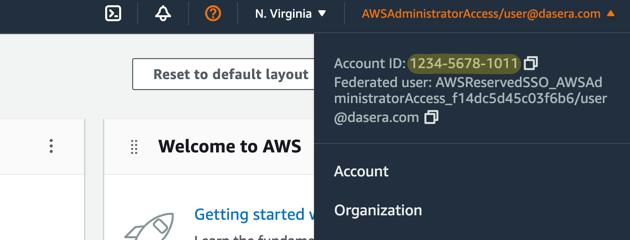 |
| Netskope One DSPM Service Account Role | Will default to Dasera_Role. Note that this value needs to be unique to each onboarded account. |
- Select CloudFormation.
- Click LAUNCH TEMPLATE to be redirected to the CloudFormation create stack screen within your AWS console. Leave Netskope One DSPM open with the Add Infrastructure modal.
- All fields will prepopulate with values from Netskope One DSPM.
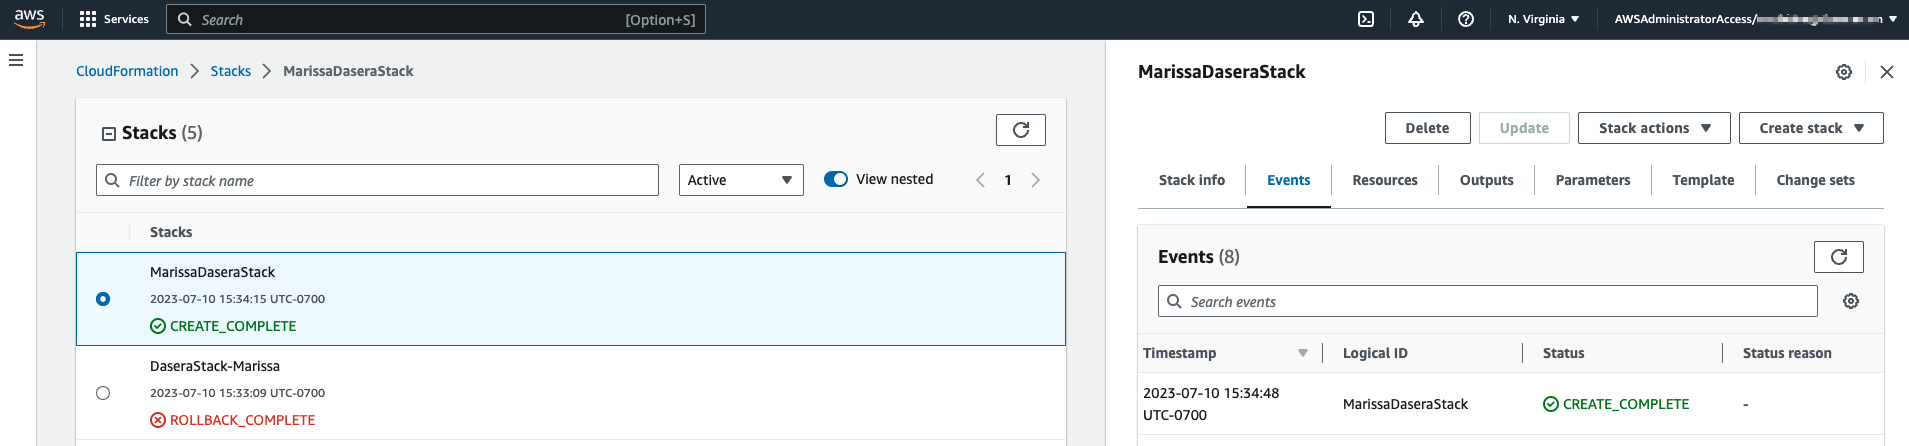
- Check the box for acknowledgment at the bottom and then click Create stack.
- Wait several seconds for your stack to create and appear in your Events.
- Return to Netskope One DSPM in your browser and click SAVE to finish connecting your AWS Infrastructure.
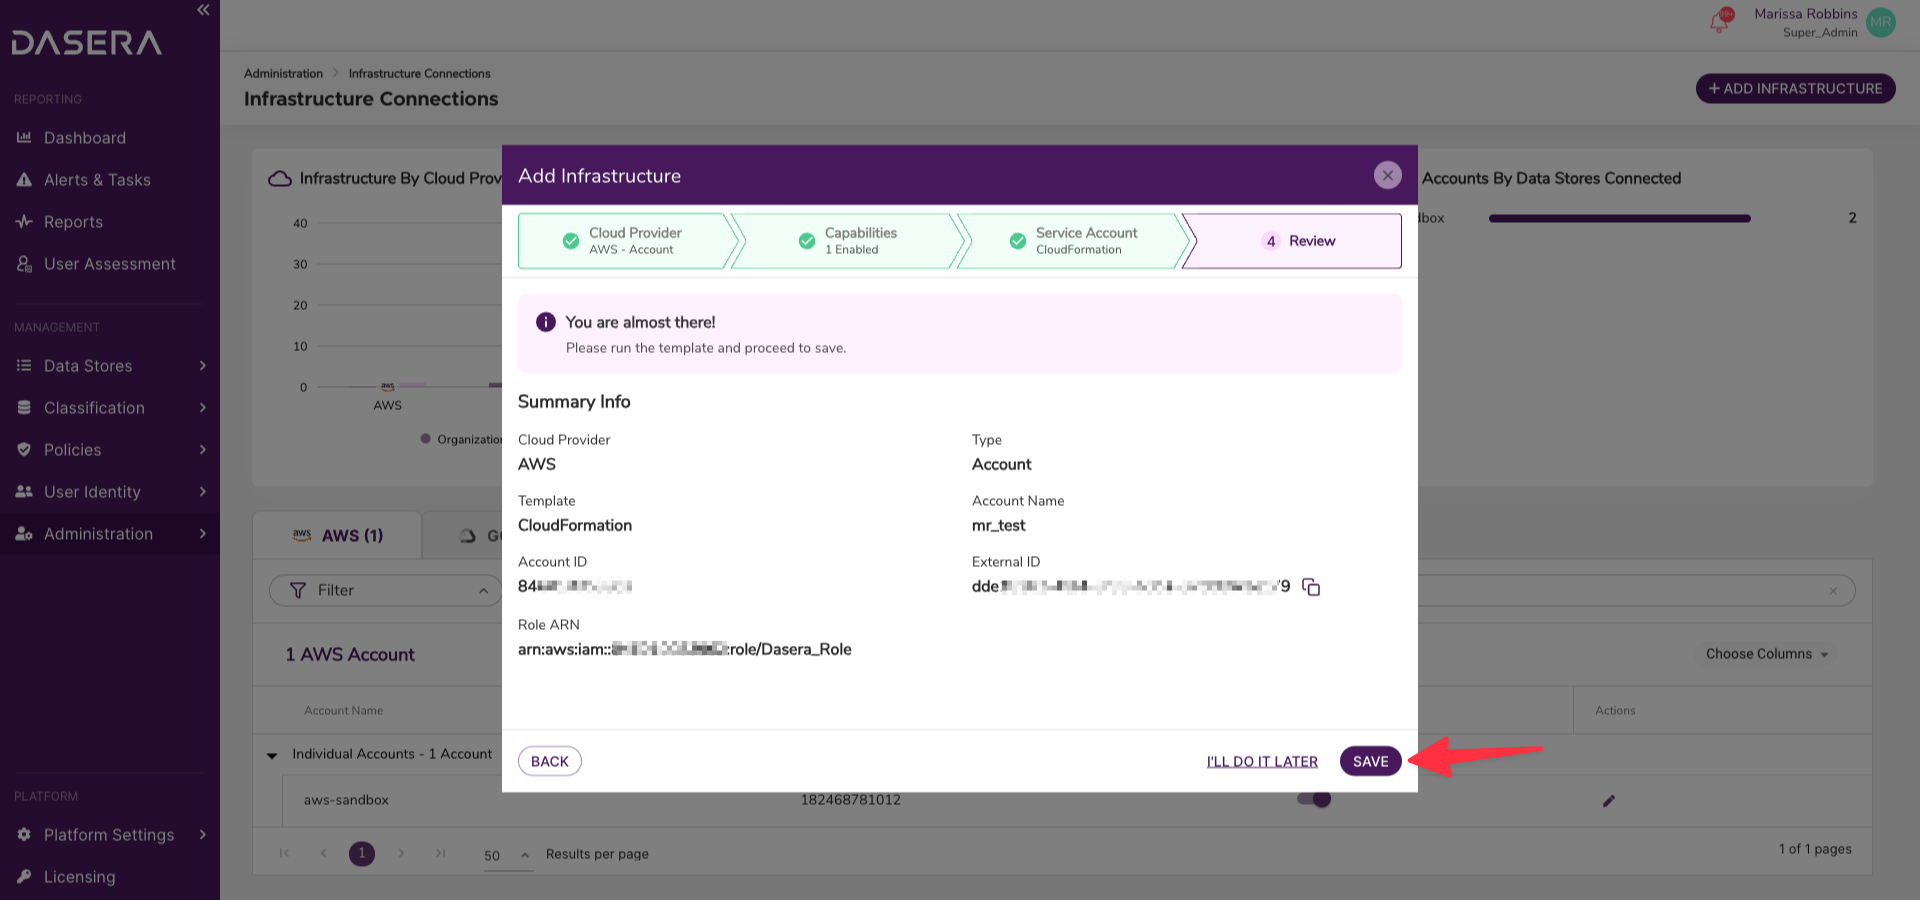
- Your AWS Account infrastructure connection is now complete, and you are able to discover data stores for analysis.
AWS Organization
Please perform these steps once for each AWS organization you'd like to onboard within the Netskope One DSPM application. Any changes to your organization's membership units will be automatically accommodated.
Steps to Complete Netskope One DSPM Infrastructure Connection
- Log into Netskope One DSPM.
- Navigate to Administration → Infrastructure Connections → AWS tab.
- Click the Add Infrastructure button in the upper right.
- Ensure AWS is selected and click ADD ORGANIZATION.
- On the Capabilities tab, set the following toggles depending on your discovery & classification needs:
| Toggle Description | Details |
|---|---|
| Auto-Discover New Accounts | Enables the auto-discovery and onboarding of newly-discovered organization members, ensuring that your accounts list always remains accurate within DSPM |
| Auto-Discover New Data Stores | Enables the auto-discovery of newly-created data stores, to ensure that DSPM is always aware of all possible data stores |
| Auto-Discover Unmanaged Data Stores |
Enables the auto-discovery of data stores on your disk volumes, to also ensure that DSPM is always aware of all possible data stores. This is disabled by default, as it can lead to performance impacts depending on the volume of disks to be scanned. |
| Ingest Tags | Enables ingestion of AWS tags associated with each connected data store, for use within both filters and and downstream policy conditions. |
| Authorize Data Store Snapshots Access | For low-touch onboarding using snapshots, enables the inclusion of the necessary IAM permissions within the CloudFormation templates and Terraform scripts generated by DSPM. These infrastructure-as-code (IaC) files are generated in the next step of infrastructure onboarding. |
- Click NEXT.
- Select CloudFormation
- Enter the following values:
| Field | Value |
|---|---|
| Organization Name | Any value (this is used to identify your infrastructure connection within Netskope One DSPM). |
| Account ID |
Obtain from your AWS Organizations console. Use the management account Account ID, as highlighted below. 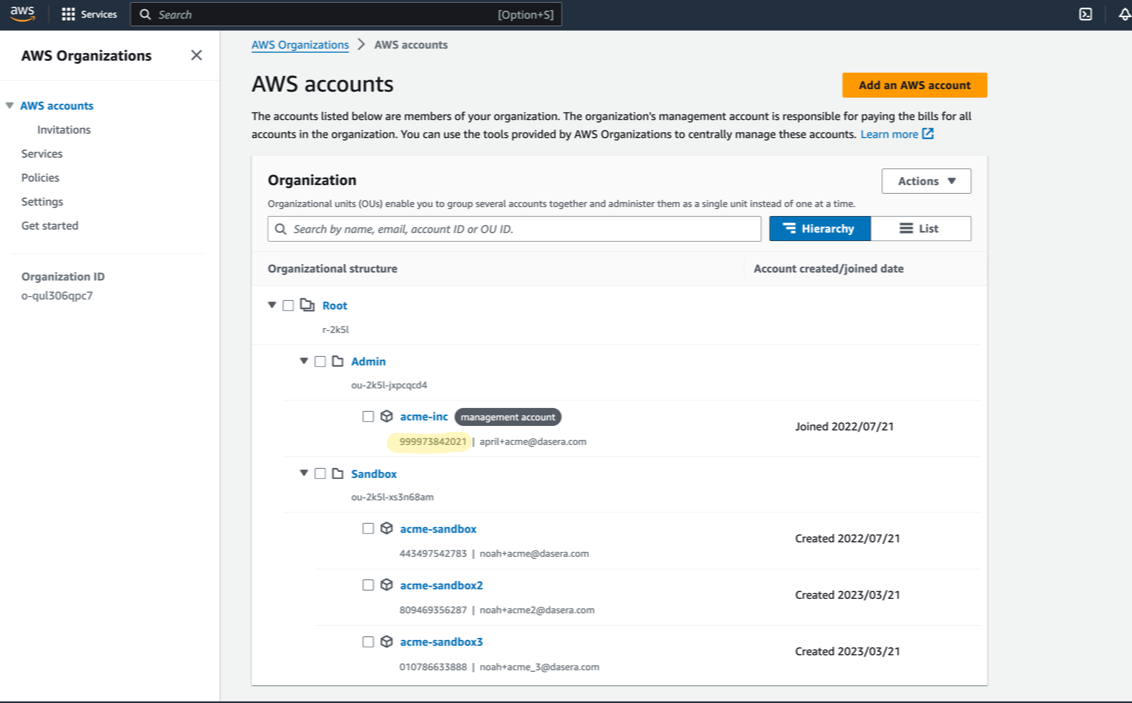 |
| Netskope One DSPM Service Account Role | Will default to Dasera_Role. Note that this value needs to be unique to each onboarded organization. |
- Click DOWNLOAD TEMPLATE. This will create and download and the templated .json file to your local machine.
At this point, you will pause your activity in Netskope One DSPM to perform actions within the AWS console. Leave the Add Infrastructure modal open.
- From the StackSet dashboard in your AWS CloudFormation Console, click the Create Stackset button.
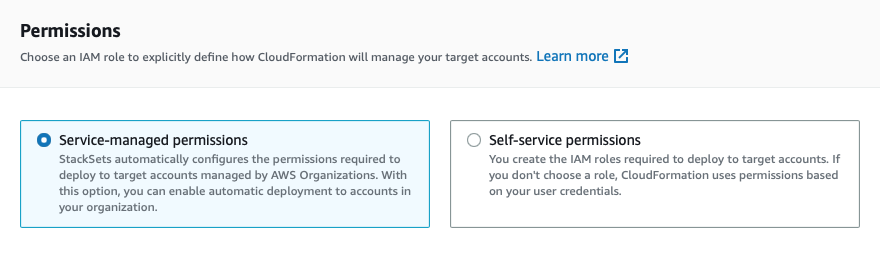
- Under Permissions, select Service-managed permissions.
- Under Prerequisite - Prepare template select Template is ready.
- Under Specify template, select Upload a template file.
- Use the choose file button to upload the .json file described in Step 8 above.
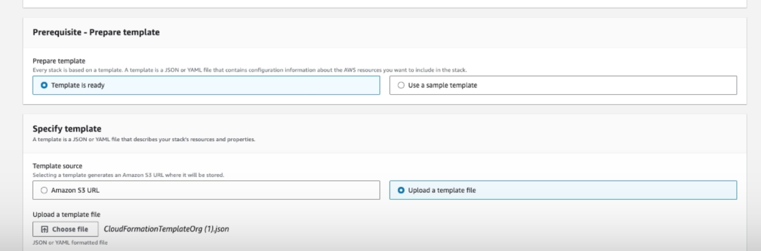
- Once uploaded, click Next.
- Give your StackSet a name and description.
- Under Parameters, DaseraRoleName and ExternalID will pre-populate based on your uploaded template. Click Next button.
- Keep Inactive selected under Execution configuration. Click Next button.
- Set deployment options should remain as default for first three sections.
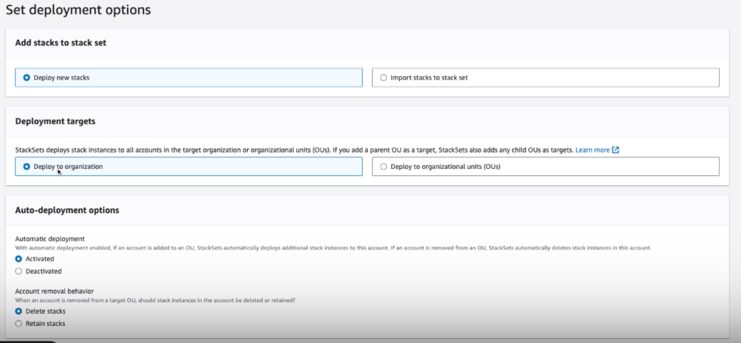
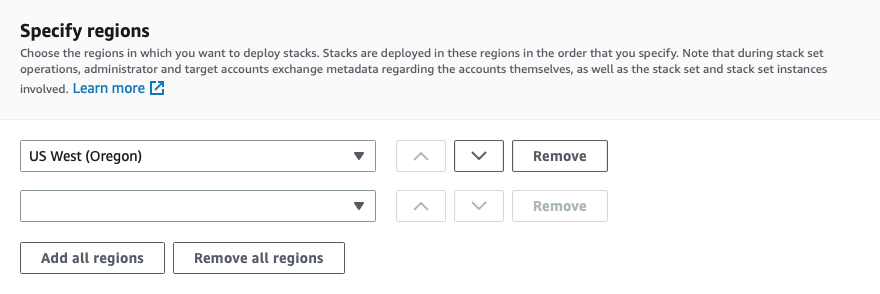
- Under the Specify regions section, select any value. While AWS requires at least one region to be selected here, this Netskope-provided StackSet will only configure IAM Roles (which belong to all regions in your organization).
- Deployment options can remain as default. Click Next button.
- Check the box for acknowledgment at the bottom and then click Submit.
- You will see the StackSet being created on the Operations tab, and once complete, on the Stack Instances tab. This has created Netskope One DSPM roles for all accounts within the management account.

- You must then create a Stack for the management account using the same .json template used in the previous steps.
- Go to Cloudformation → Stacks. Click Create Stack and select With new resources (standard) from the dropdown.
- Click Next then select Upload a template file for template source. Click Choose file and upload the same .json file described in step 8 above.
- Wait several seconds for your stack to create and appear in your Events.
- When your StackSet and Stack are created and running, return to Netskope One DSPM in your browser and click SAVE to finish connecting your AWS Infrastructure.
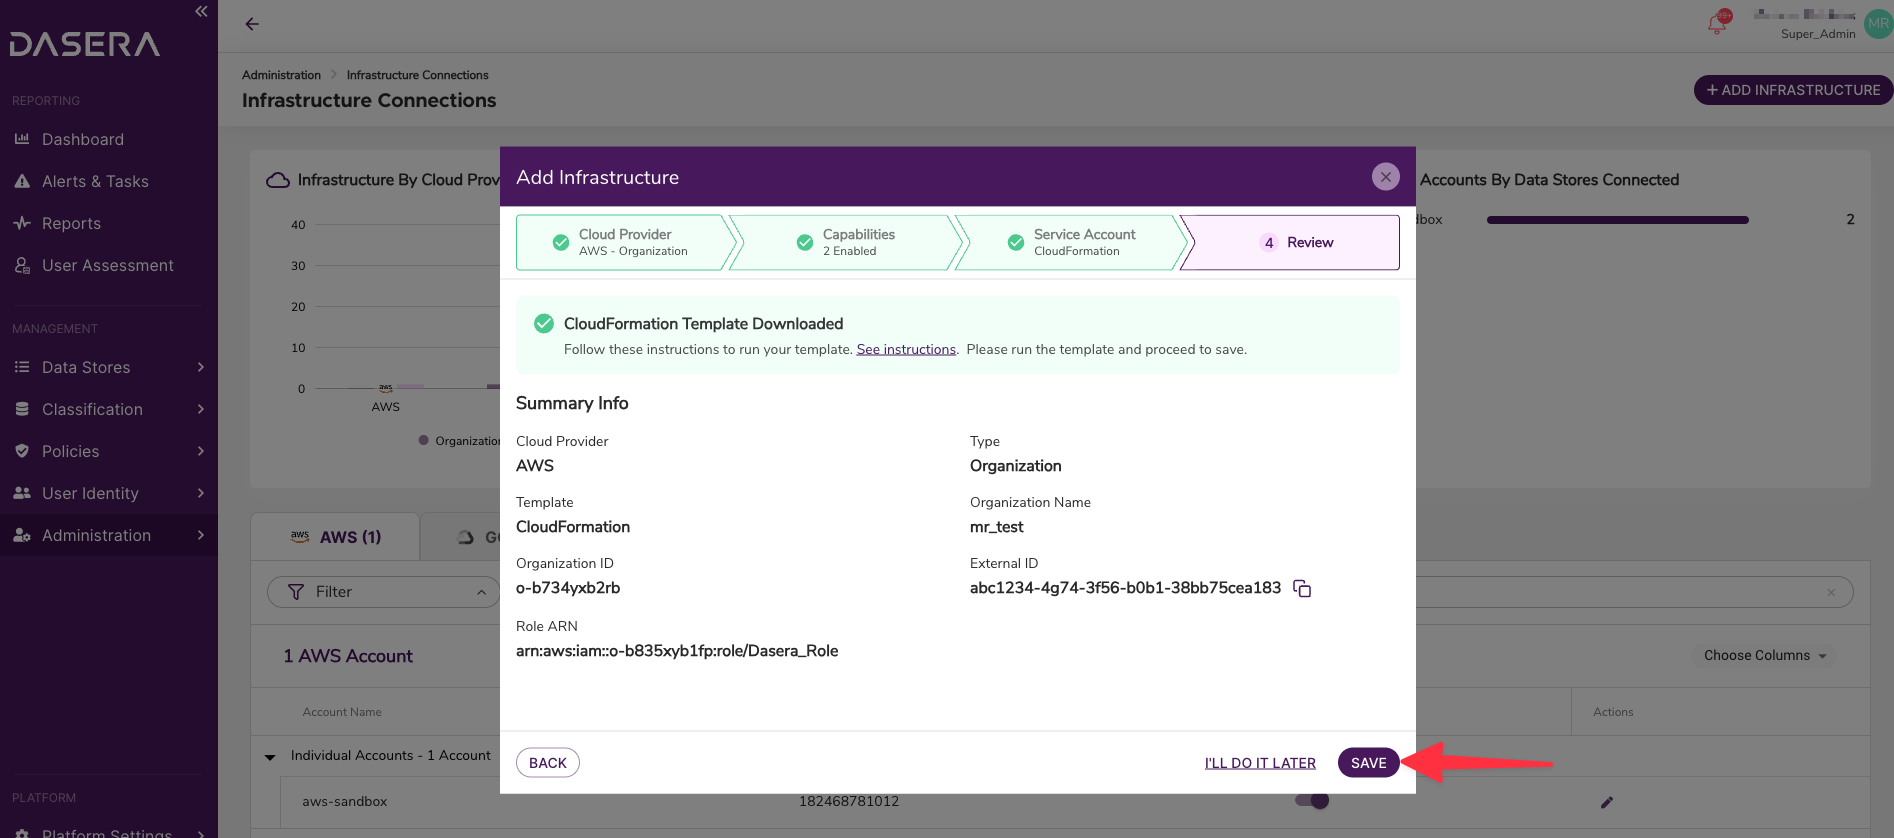
- Your AWS Organization infrastructure connection is now complete, and you are able to discover accounts within the organization and data stores for analysis.
Note: For each AWS Account infrastructure connection, if it is a member of the Organization being onboarded, we consolidate that individual Infrastructure Connection to fall underneath the Organization within the UI.
Next Steps
- If you have additional AWS Organizations or individual accounts to onboard in Netskope One DSPM, repeat the above steps.
- Connect your discovered Data Stores. For more information, visit our Connecting AWS Data Stores category and select the article(s) applicable to the Data Store Type(s) you wish to connect.