Overview
The Netskope One DSPM application requires seamless connectivity to scan your data stores. However, as per common security practices, businesses tend to deny proper firewall egress between their internal networks and external applications. Such limitations impact the operational use of Netskope One DSPM and reduce the full return value of your subscription.
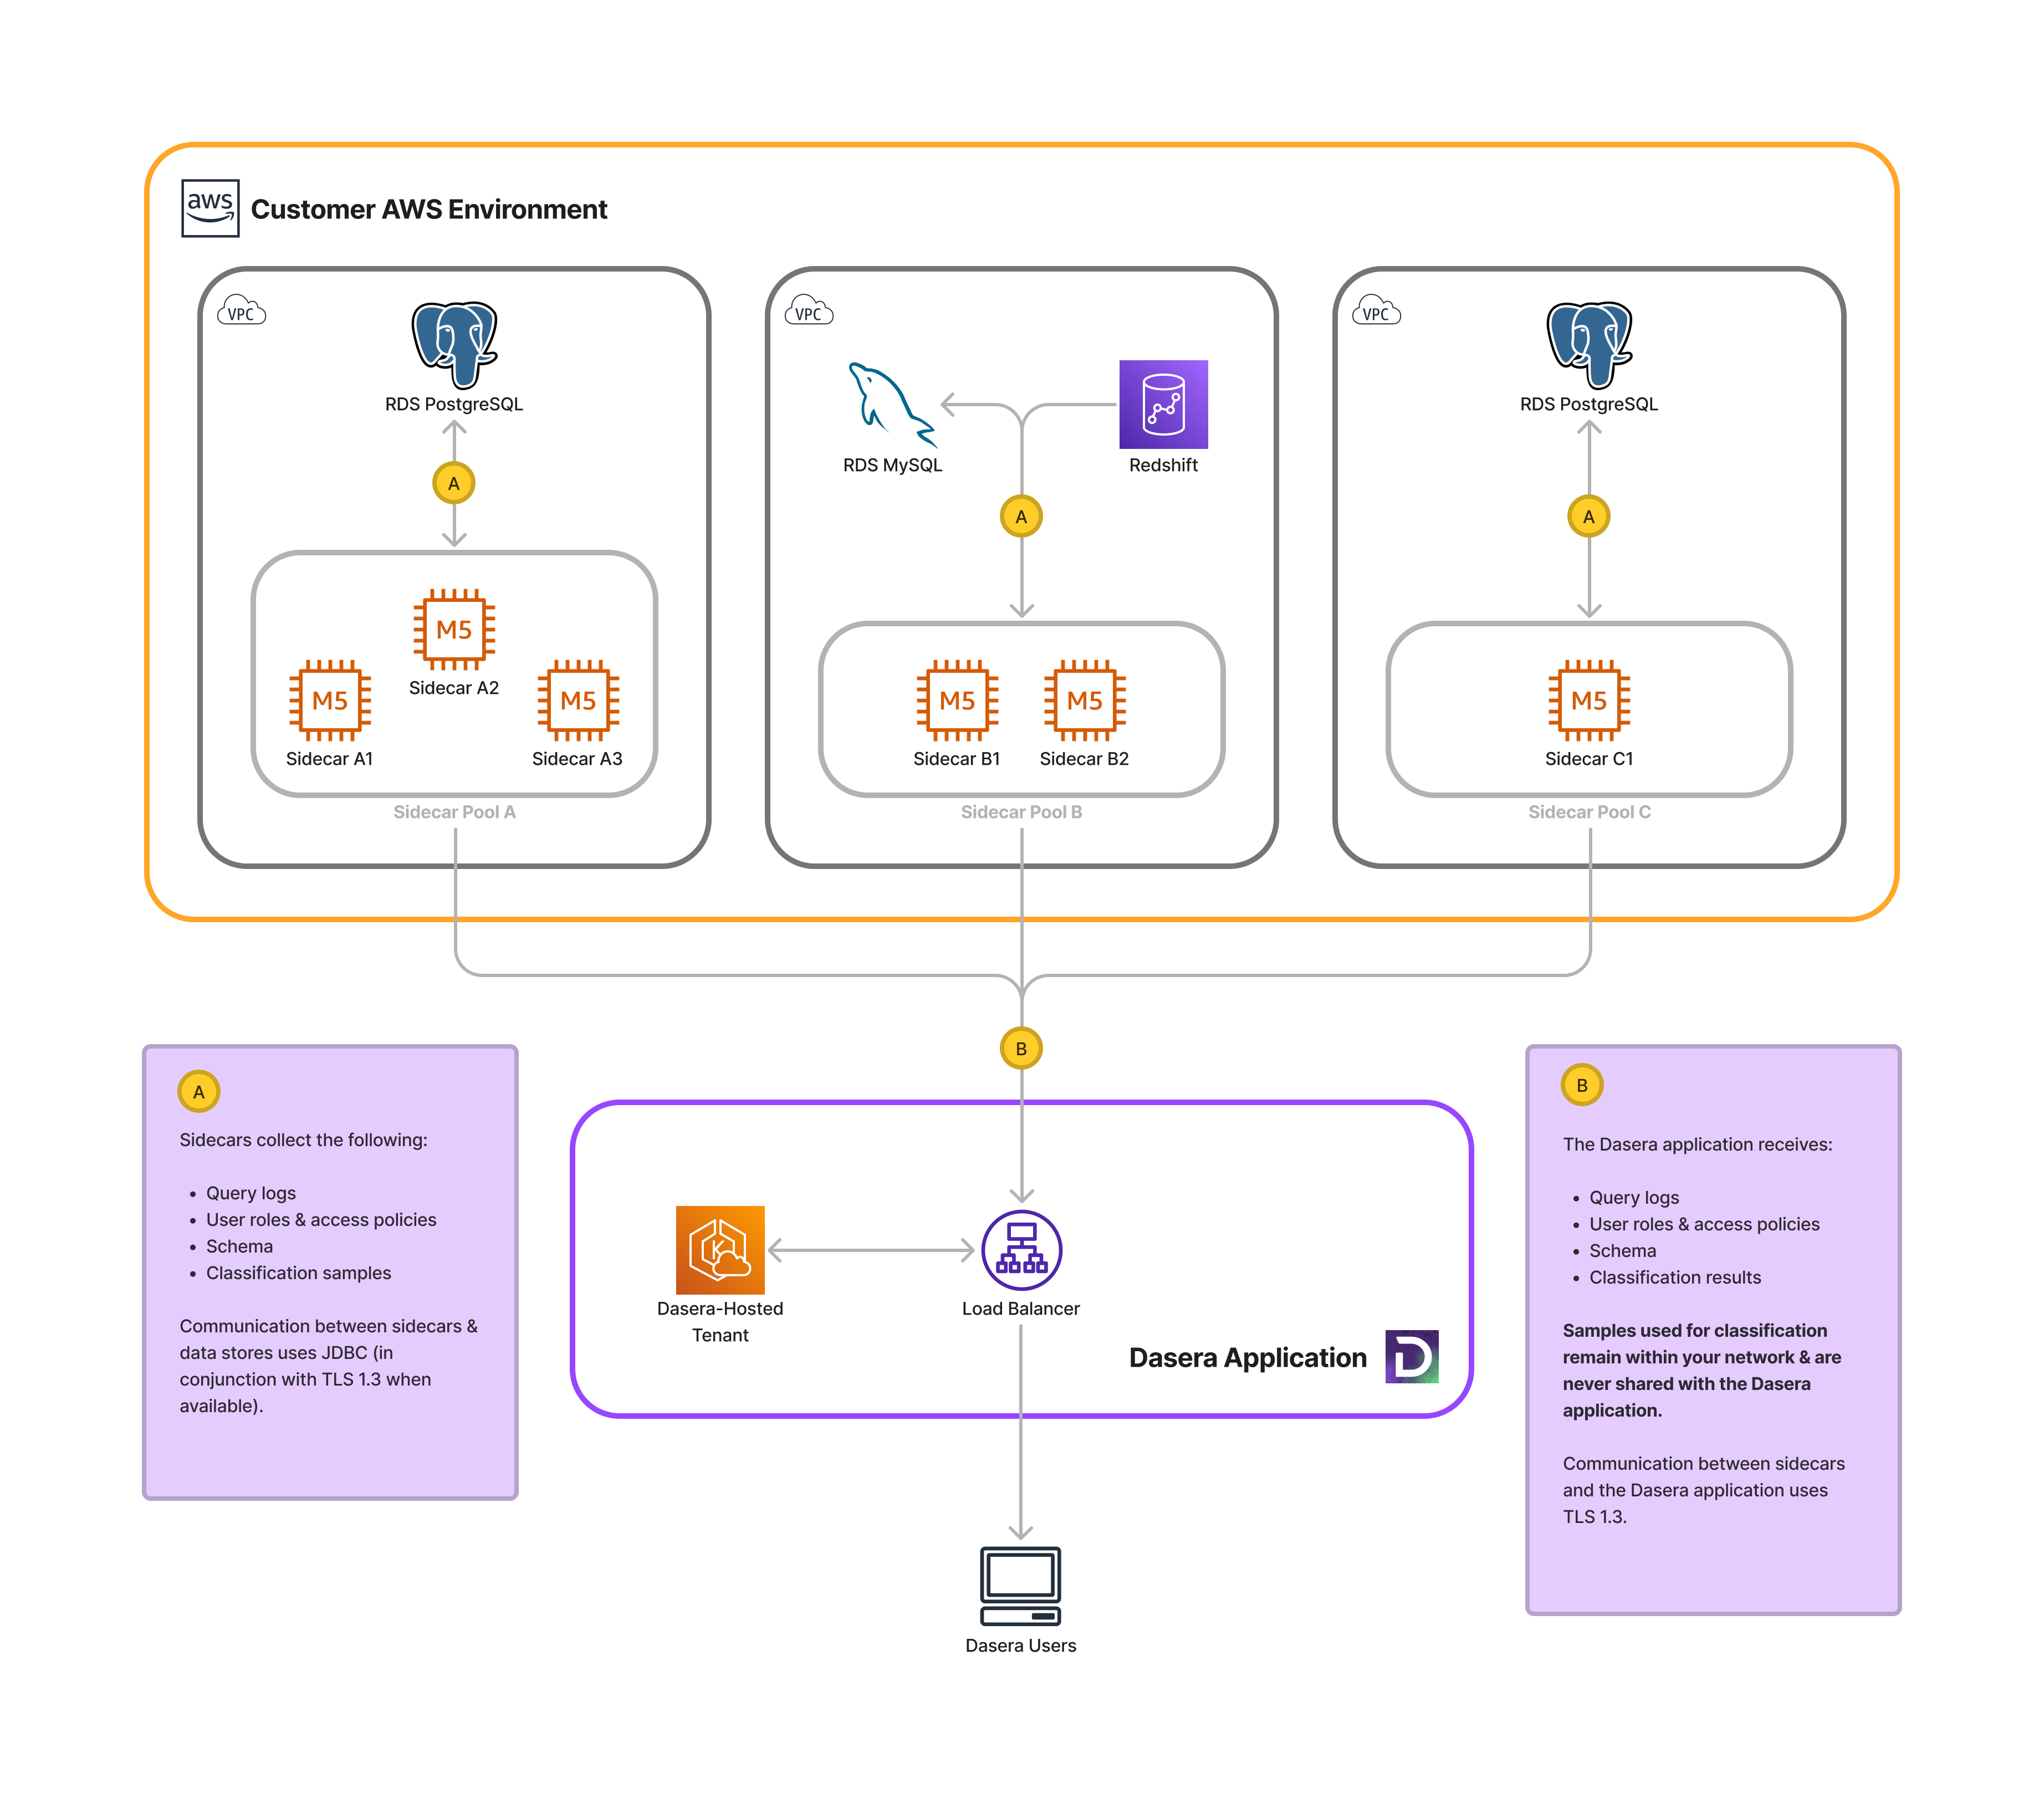
To overcome this, Netskope One DSPM provides a flexible collection architecture consisting of one or many sidecars you can deploy alongside your data stores. These sidecars collect necessary metadata and transfer it to the Netskope One DSPM application. Within this central management console, you can take action on insights from across all data stores regardless of where they are hosted.
Prerequisites
Before beginning, the Netskope One DSPM sidecar AMI needs to be shared with your organization. To request this AMI, please contact your CSM and supply:
- Your AWS account number; and
- The AWS region where you will deploy the Netskope One DSPM instance (which we require in order to share the image).
In addition:
- You will need a Netskope One DSPM-hosted tenant to receive the sidecar-collected metadata.
- Ensure that you validate the latest version of the required toolsets by running the following commands at your terminal prompt:
terraform --version (Ver 1.3.2 or higher)
aws --version (Ver 2.8.2 or higher)
git --version (Ver 2.38.x or higher)
Architecture
Excerpt: Sidecar: Architecture
Netskope One DSPM provides a flexible collection architecture, consisting of one or many sidecars you deploy alongside the main application. These sidecars connect to data stores to runs scans, uploading the results to the Netskope One DSPM application.
A single sidecar can scan multiple data stores in its installation environment. Typically, you will deploy one sidecar per individual environment (e.g. VNet, VPC, etc.), however you may choose to install multiple sidecars for additional scalability and redundancy. The Netskope One DSPM application automatically load balances scans across healthy sidecars in each sidecar pool.
Register Sidecar
To set up the relationship between your sidecars and Netskope One DSPM-hosted tenant, you will provide the sidecars with unique authentication tokens generated within our Sidecar Administration UI.
If you already have an existing sidecar token to use, you can skip this section. Otherwise, follow these instructions to acquire a new token.
Excerpt: Sidecar: Registration
Log into the Netskope One DSPM application. Navigate to the Platform Settings > Sidecar m
To set up the relationship between your sidecars and Netskope One DSPM-hosted tenant, you will provide the sidecars with a unique authentication token generated within our Sidecar Administration UI.
If you already have an existing sidecar pool token to use, you can skip this section. Otherwise, follow these instructions to acquire a new token.
- Log into the Netskope One DSPM application.
- Navigate to the Platform Settings > Sidecar menu to display the Sidecar Administration screen.
- Click the Add Sidecar Pool button.
- The Add Sidecar Pool modal is displayed.
- On the Details tab, complete the following field:
| Field | Value |
|---|---|
| Name | Any friendly value to describe the sidecar pool. |
- Click Save.
- Click Copy at the bottom of the Sidecar Authentication Token modal to save the generated token to your clipboard.

- Click the “x” button to exit the modal.
Since you haven't yet associated this token with a sidecar, the sidecar pool will appear only when you click the Show Inactive Sidecars icon in the upper right, with empty Version and Status columns for now.
The above-generated token will be used for each individual sidecar within the sidecar pool.
In addition, ensure that you validate the latest version of these toolsets by running the following commands at your terminal prompt:
terraform --version (Ver 1.3.2 or higher)
aws --version (Ver 2.8.2 or higher)
git --version (Ver 2.38.x or higher)
Setting up the AWS Configuration
- At the terminal prompt or command shell type aws configure and provide the inputs as below
AWS Access Key ID :
AWS Secret Access Key :
Default region name [us-west-2]:
Default output format [json]:
Note : Your AWS CLI should be referenced in the PATH variable
- Copy the following URL in your browser window to download the requisite Terraform scripts
https://dasera-release.s3.us-west-2.amazonaws.com/Netskope One DSPM-terraform.zip- Extract the Netskope One DSPM Terraform scripts in your local system folder which will create a folder with two sub folders deploy and modules.
Running the Terraform Script
Navigate to the sidecar_instance_only folder created from the extraction above, depending on your desired outcome.
From that directory, run the following command to initiate your Terraform environment successfully.
terraform initIf your initialization is successful you would see a message like “Terraform has been successfully initialized!”
To validate that you have all the pre-requisites configuration details available for the installation, run the following command
terraform planWhen prompted, enter the following variables:
| Parameter | Value |
|---|---|
| ami_id | AMI ID of the Netskope One DSPM sidecar image shared with your organization. This value can be found in your AMI Catalog in the My AMIs section. Clear all filters and filter by Owner = “Shared With Me”. |
| security_group_id | Your own AWS security group that you wish to associate. Please ensure the security group belongs to the same network as the subnet you will launch the Netskope One DSPM sidecar, otherwise deployment will fail. |
| subnet_id | This is the subnet to launch the Netskope One DSPM sidecar. This will determine the VPC and availability zone of the sidecar. |
| key_name | Name of the SSH key you wish to install on the sidecar. Installing patches and security updates requires an admin to connect to the sidecar via SSH. If this is pre-configured you can select the same from the drop down list; otherwise, please configure a new key pair within the AWS EC2 Console. |
| Netskope One DSPM_host |
Your tenant URL minus the protocol. For example, if your tenant is accessed using https://example.dasera.io, your value will be example.dasera.io. |
| sidecar_token | An existing sidecar token, or a new one generated in the Register Sidecar section above. |
If any of these details are not available with you or you receive an error please revisit the Prerequisites section at the start of the document before continuing further.
To initiate the Terraform installation run the following command from the deploy/instance_and_roles folder.
terraform applyThe script will begin and perform the following actions:
- Prompt you to input - Provide the same set of 6 configuration details in sequence as listed in the table above.
- Check for errors - In the event an error occurs, follow the on-screen instructions for correcting & resuming.
- Outputs a resource modification list. To learn more about the resources created by the script, please expand the section below.
- Prompt you to confirm before executing. To confirm you must type yes.
When the script completes successfully and the AWS resources are provisioned correctly, the output will similar to the following example.
Apply complete! Resources: 1 added, 0 changed, 1 destroyed.

Outputs:

ids = "i-0dc55679d6d318d76"
ssh_ip = [
  "XXX.XXX.XXX.XXX",
]
Resources Created
In the console output, the following resources are listed:
Excerpt: Sidecar: Resources Created
| Resource Type | Resource Name |
|---|---|
| AWS::EC2::Instance | Netskope One DSPMSidecar |
Each sidecar instance is deployed as a m5.2xlarge EC2 instance (equaling 8CPU/32GB).
Validate Sidecar Connection
Excerpt: Sidecar: Validate Sidecar Connection
Once a sidecar instance is running, you can now validate it is properly-com
When deploying sidecar, you'll need to ensure that the sidecar has the ability to reach two URLs on port 443:
https://[tenant-name].dasera.io https://[tenant-name]-sidecar.dasera.ioTake the following steps to verify the connectivity from the sidecar.
- SSH to the sidecar
- Run the command [curl] to [api/pulse] for both URLs, as shown below
curl https://[tenant-name].dasera.io/api/pulsecurl https://[tenant-name]-sidecar.dasera.io/api/pulse- A successful response will resemble the following
{"version":"10.0.0.311","build_target":"prod","deployment_type":"saas"}%
Once a sidecar is running, you can now validate it is properly communicating with your Netskope One DSPM application.
- Log into the Netskope One DSPM application.
- Navigate to the Platform Settings > Sidecar screen.
- For the sidecar(s) in question, validate that Version column is populated and its matching Status indicator is green.
It may take a few minutes for newly-running sidecars to communicate with the Netskope One DSPM application. If both values have not updated after 20 minutes, double-check that you configured your sidecars correctly and update the pool token, if necessary.
Rotating Sidecar Tokens
Excerpt: Sidecar: Token Rotation
These instructions apply if your security practice requires regularly rotating se
These instructions apply if your security practice requires regularly rotating security tokens, or if your sidecar is failing to communicate with the Netskope One DSPM application due to an invalid token. These steps will be repeated for each individual sidecar within the sidecar pool.
Generate New Token in Netskope One DSPM
- Log into the Netskope One DSPM application.
- Navigate to the Platform Settings > Sidecar to open the Sidecar Administration screen.
- For the sidecar pool registration whose token you wish to rotate, click the Generate New Token icon.
- Generate New Token modal is displayed. Read then click Confirm.
- Click Copy at the bottom of the Generate New Token modal to save the generated token to your clipboard.
- Close modal.
Apply New Token in AWS
The following steps require CLI access in order to complete.
- Log into the AWS EC2 Console. The EC2 dashboard is displayed.
- In the left menu, navigate to the Instances > Instances screen. The Instances dashboard is displayed.
- In the list of instances, click the Instance ID hyperlink corresponding to the Netskope One DSPM sidecar requiring the token update. The Instance Summary screen is displayed.
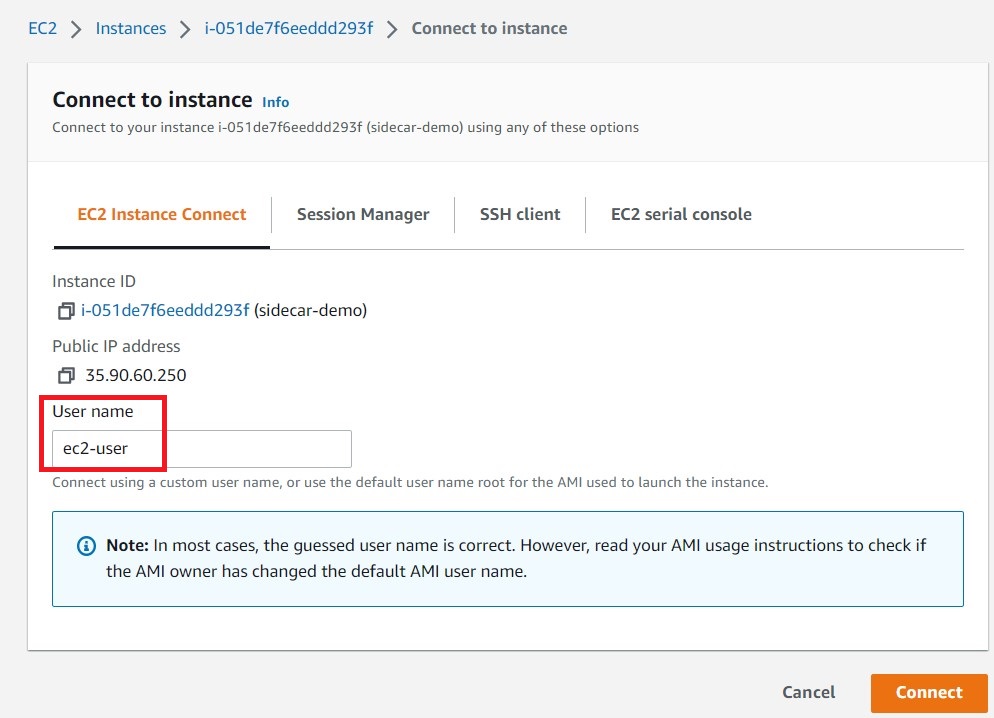
- Click the Connect button. The Connect to instance screen is displayed.
- Provide root as the user name and press the Connect button below to start a SSH session to the sidecar.
- The AWS CLI is displayed.
- Enter the command
cat /etc/netskopeconfto display details of the Netskope One DSPM application tied to this sidecar along with its current token: - Enter the command
sudo vi /etc/netskopeconfto open the sidecar's configuration file. - Search for the SIDECAR_TOKEN parameter and replace its current value with the new token.
- Save your changes and exit the vi editor.
- To validate that the sidecar is using the new token, enter the command
cat /etc/daseraconfand validate that the SIDECAR_TOKEN parameter is using the new token. - Once confirmed, restart the sidecar by entering the command sudo reboot.
At this point, the SSH console will disconnect. Return to the AWS EC2 Console and verify that the sidecar reboot is complete.
Excerpt: Sidecar: Validate Sidecar Connection
Once a sidecar instance is running, you can now validate it is properly-com
When deploying sidecar, you'll need to ensure that the sidecar has the ability to reach two URLs on port 443:
https://[tenant-name].dasera.io https://[tenant-name]-sidecar.dasera.ioTake the following steps to verify the connectivity from the sidecar.
- SSH to the sidecar
- Run the command [curl] to [api/pulse] for both URLs, as shown below
curl https://[tenant-name].dasera.io/api/pulsecurl https://[tenant-name]-sidecar.dasera.io/api/pulse- A successful response will resemble the following
{"version":"10.0.0.311","build_target":"prod","deployment_type":"saas"}%
Once a sidecar is running, you can now validate it is properly communicating with your Netskope One DSPM application.
- Log into the Netskope One DSPM application.
- Navigate to the Platform Settings > Sidecar screen.
- For the sidecar(s) in question, validate that Version column is populated and its matching Status indicator is green.
It may take a few minutes for newly-running sidecars to communicate with the Netskope One DSPM application. If both values have not updated after 20 minutes, double-check that you configured your sidecars correctly and update the pool token, if necessary.
Upgrading Sidecars
The following steps require CLI access in order to complete.
You may need to occasionally upgrade your sidecars so they remain compatible with your Netskope One DSPM application instance or tenant.
Your account team will provide you the location for a patch file in AWS S3. Using that value, run the following command from the sidecar's CLI (substitute <patch address> with the provided AWS S3 location).
wget <patch address> && patchThis upgrade process may take a couple minutes.
Next Steps
Excerpt: Next Steps: Connecting Data Stores
Connect your discovered Data Stores. For more information, visit our Connecting A
Connect your discovered Data Stores. For more information, visit our Connecting AWS Data Stores category and select the articles applicable to the Data Store Types you wish to connect.